Showing posts with label Tasty Tuesday. Show all posts

Tuesday, August 30, 2011

Tasty Tuesday: Lemon Garlic Chicken and Sticky Coconut Chicken

We are a house of chicken eaters, so I love trying new flavors and ways to cook up chicken. I saw this recipe a few weeks ago on Money Saving Mom and knew I had to try it. While checking out the recipe I found another recipe that looked yummy, Sticky Coconut Chicken.


My plan was to grill about 6 chicken breasts in the lemon/garlic marinade, but decided I would divide it between the two and same some for later.


Lemon Garlic Chicken- from Mel's Kitchen


Juice of 1 lemon, approximately 3 tablespoons
3 tablespoons olive oil
1 teaspoon minced garlic, about 2 medium cloves
1 teaspoon salt
1/4 teaspoon pepper
1/2 teaspoon dried oregano
1 pound chicken breasts 
Combine all marinade ingredients. Place chicken in a ziploc bag and pour marinade over chicken. Seal bag and place in fridge overnight. Grill (or cook in frying pan). Serve with sides of your choice or cut into bite sized pieces and add to desired recipe (I’ll be sharing a few with you soon). Note: If you cut your chicken into smaller, bite-sized pieces and then marinate it, you can get away with only letting it marinate for 5 or 6 hours instead of overnight.
Serving with roasted parmesan red potatoes and green beans.

Sticky Coconut Chicken-original recipe from Mel's Kitchen. I changed my version just slightly based on what I had on hand.
3 skinless, boneless chicken breasts
1 cup canned coconut milk
1 Tbsp. ground ginger
1 tsp. fresh ground pepper
1/2 tsp. roasted red chili paste

Mix all ingredients together and marinate chicken for at least 1 hour or longer. Grill on barbecue.
Glaze:
3/4 cup rice vinegar
1/2 cup sugar
3 Tbsp. soy sauce
pinch roasted red chili paste
While the chicken is grilling, bring above ingredients to a boil over medium-high heat and cook until mixture is reduced and thickened, about 8-10 minutes. Be patient because it takes a little while. But once it starts getting really thick, immediately take it off the heat! Glaze both sides of chicken the last few minutes of grilling and serve chicken over rice.
Serving with stir fry noodles and veggies. 

Tuesday, August 23, 2011

Tasty Tuesday: Crescent City Pot Roast


So, I'm a southern girl and as any good southern girl knows one of two things must be cooked for Sunday dinner: pot roast or fried chicken. I haven't fried chicken in close to 10 years. Oh not because I don't like it, but because it doesn't like me (and it would offend my friend Ricardo the Rooster who lives in Downtown Ocean Springs). However, the one thing I have cooked many, many times over the past several years is the Pot Roast from Robert St. John's cookbook, Deep South Staples or how to survive in a southern kitchen without a can of cream of chicken soup. Just typing this my mouth is watering. So glad I'm making this for dinner tonight!

Pot Roast
2 1/2-3 lb beef shoulder roast
1 T Kosher salt
2 tsp. black pepper
1 T. steak seasoning (I use Montreal steak seasoning)
1/4 c. Bacon grease or canola oil
1/2 c. flour
2 cups onion, diced, plus 1 large onion cut into wedges
1/4 tsp. thyme
3 c. beef broth, hot
2 tsp. Worcestershire sauce
1 tsp. salt
1 tsp. black pepper
3 carrots, peeled and cut into quarters
2 large Idaho potatoes, peeled and cut into quarters

Preheat oven to 275 degrees.

Season the beef with kosher salt, pepper, and steak seasoning. In a large heavy-duty skillet, heat the bacon grease over high heat. Brown roast on all sides and place in a roasting pan. Lower heat on the skillet and add olive oil and flour to make a peanut butter-colored roux. Add diced onions and thyme and continue to cook for 4-5 minutes. Add hot beef broth, worcestershire sauce, salt and pepper, and stir until smooth. Pour liquid into roasting pan with the pot roast. Cook 2 hours. Remove foil and add carrots. Return to oven and cook uncovered for another hour. Remove, add potatoes, and cook for 1 more hour.

Serves 8

Wednesday, August 17, 2011

Tasty Tuesday: Quick Cheap Treats


With two little girls running around the house (plus multiple other kids coming and going on a daily basis), trying to meet a budget, running this blog, teaching classes, homeschooling, etc. money and time are at a premium so I am always looking for quick, cheap snacks for the kids.


I shared a few of those cheap treats a few weeks ago, like microwave popcorn in a brown paper sack, homemade chex mix and pudding pops. Well here are two more to add to that list: chocolate banana bites, and DIY Energy bites!


**Now I did find these recipes online, but the versions you see here are my take on the recipe. A link is provided to the original.


Frozen Chocolate Banana Bites original recipe from (never home) maker
2- bananas (firmer bananas hold together better)
1/2 c. chocolate chips
1/3 c. peanut butter


Melt the chocolate chips and the peanut butter in 20 second intervals in the microwave; making sure to stir after each session. Peel and cut the bananas into 1/2-1 inch discs. Dip in chocolate lay on wax paper and pop them in the freezer until firm.  Place in resealable bag or container and store in the freezer for a quick, cool treat.


DIY Energy Bites from Food Doodles
1/2 c. peanut butter or other nut butter (I used a 50/50 mix of peanut butter and nutella)
1/3 c. honey
1 c. old fashioned oats
1 c. shredded coconut
2 tsp. vanilla


Mix the nut butters, vanilla and honey together. You may need to put it in the microwave for about 10 seconds to soften it up and make it easier to stir. Add in all other ingredients; pop in the fridge for about an hour. Roll into balls; store in a resealable container in the fridge.

Tuesday, August 9, 2011

Tasty Tuesday: Apple Salad


Have company coming and you need a quick dessert? The ingredients for this Apple Salad are easy to keep on hand and pretty inexpensive. Plus adjust it just slightly (less snickers, reduced calorie/sugar cool whip) and it's not too bad on the diet!


I love Google for images when I failed to snap a picture!

Apple Salad
3 Granny Smith Apples
3 Red Apples (not red delicious, look for jazz or honey crisp)
3 Snickers Bars
Handful of peanuts (optional)
1 container Cool Whip


Chop apples  (do not peel) and Snickers. Mix with cool whip and peanuts. Chill; serve within a few hours.

Tuesday, August 2, 2011

Tasty Tuesday: Fall Apart Chicken


I've had this recipe for several years but I don't remember where I found it! I'm bad about that. Guess I should start writing it down, because I would imagine there are other good recipes in that location.


Fall Apart Chicken


1 can cream of chicken soup
1 block cream cheese, softened
3 chicken breasts
1 stick butter or margarine
1 pkg. Italian dressing
1 can water


Put chicken, butter and seasoning in crockpot. Cook on low for 3 hours. Add soup, water and cream cheese. Cook for 3 more hours. Remove chicken; shred and add back to crockpot. Serve over rice.

Tuesday, July 26, 2011

Tasty Tuesday: No Cook Eggless Ice Cream


Nothing says summer like the sound of a churning ice cream machine filled with the delicious goodness of homemade ice cream! My family for several generations has made the uncooked version that means having raw eggs in the ice cream. Just one problem, as good as it tastes it completely grosses me out to find a piece of egg in my ice cream. 


No worries, help is on the way! Like I said it just grosses me out to have raw egg in the mix and I'm not about to feed that to my children so I went on the hunt for an eggless ice cream mix. After many searches and failed attempts I got the recipe below. Don't ask where it came from, because I do not remember. All I know is no eggs were harmed in the making of this ice cream!


No Cook Eggless Homemade Ice Cream 
Makes 1 quart


1 (14 oz.) can sweetened condensed milk
1 (5 oz.) can evaporated milk
2 T. sugar
2 tsp. vanilla
2 c. whole milk


Mix it all together and pour it into your ice cream mixer. Layer ice and rock salt then crank it 
up. Delicious! You could add other ingredients to change the flavor such as crushed oreos, butterfinger or chocolate syrup.


Want to get the kids involved? Pour 1/2 c. of the mix into a quart size ziploc bag and seal up tight. Fill a gallon size bag about half full with ice and add salt (table salt will work but you have to use a lot).  Put the smaller bag inside the gallon bag and shake with all your might for 5-7 minutes or until ice cream is firm. **I made this with my 8 year old a few weeks ago and she had a blast! I would suggest wrapping a towel around the bags because they are VERY cold!

Tuesday, July 19, 2011

Tasty Tuesday: Crockpot Creole Daube


I LOVE to cook! Cooking in any form is one of my favorite past times. I am always trying out new recipes I find online or in cookbooks(you should see my collection) or come up with on my own. Testing them on my family and unsuspecting guests! (I know, how nice of me right!?)  There have been major flops and failures like the instant oatmeal muffins a few weeks ago (yuck!).  Then there are the ones that you hit out of the park that go on to the regular rotation of meals. Creole Daube is one of those recipes. 


I've heard of Daube before. According to Deep South Dish daube was a staple in the Point Cadet area here on the Mississippi Gulf Coast but has waned in popularity over the last generation or so. I did a little research on Daube, a French term, with the recipe (or something similar) being brought to this area by French settlers in the 1700's when Mississippi was part of the Louisiana Territory.


I also enjoy trying out foods that are indigenous to the area. I have a dislike of chain restaurants(thanks to the hubby), where no matter what city I'm in the dishes from restaurants like Applebee's will always taste the same. Over the last 10 years it was the hubby's influence that changed my opinion of chain restaurants and encouraged me to look locally for the mom & pop places that will serve food you can find no where else.


So with all that said, when I found the recipe on Deep South Dish I had to try it! Now, I'm not one to follow recipes exactly as written. Isn't that considered a mark of a true chef? I sure hope so! Otherwise I'm just screwing these recipes up. Below you will find MY recipe for Crockpot Creole Daube. If you would like to see the recipe it's based on check out Deep South Dish.


Creole Daube
-will feed a family of 6 easily! We ate half and I froze the rest.


1- small/medium roast (a cheap cut is fine)
1 large onions, chunked
1 large green bell pepper, cut into stripes
2 T. minced garlic
1 large can whole tomatoes (I used San Marzano style), chop up as you pull them out.
1 small can of tomato sauce
1 pinch of sugar1 cup water

2 beef bullion cubes
Splash of Worcestershire sauce
salt and pepper to taste1/2 teaspoon Tony Cachere's 


You ready for the really difficult directions? I'm not sure you can handle this....................


Put EVERYTHING in the crockpot at the same time and cook on low for 6 hours or until the roast is falling apart. Pull out the roast and shred up. Serve over cooked spaghetti noodles, garlic bread and maybe a salad. 

Printable version

Tuesday, July 5, 2011

Tasty Tuesday: Mardi Gras Pizza


We LOVE pizza at the House of Collums! Delivery gets too expensive, and I try not to buy the prepackaged stuff very often. So necessity (and not wanting all the preservatives) forced me into finding a dough recipe.  This is one of our favorite pizza ideas, Mardi Gras Pizza! This same type of pizza is served at Old Venice Pizza Co. in Jackson, MS and a bbq sauce version at Tom's Extreme Pizza in Ocean Springs and Gautier. We love both versions so much we make our version at home!


Here's my recipe: Makes 2 small pizzas


Mardi Gras Pizza
1-recipe Everything Yeast Dough
1 small red(purple) onion, diced
1 small green bell pepper, diced
1small yellow bell pepper, diced
andouille sausage, browned (amount depends on how much you want!)
1/2-1 block cream cheese, softened
mozzarella cheese
garlic salt


Prepare your dough as directed; bake until lightly browned. Remove from oven and spread cream cheese on top. Then sprinkle peppers, onion and sausage on top (as much or as little as you want). Top lightly with mozzarella cheese and a sprinkle of garlic salt. Bake a second time until cheese it melted.


*When using prebaked dough (like Boboli) start by topping with cream cheese and then proceed as directed. 

Tuesday, June 28, 2011

Tasty Tuesday: Freezer Jam


After my experience at the canning party on Saturday I was inspired! We had four teams and a line up of secret ingredients. Our team was the last to go and we ran out of strawberries! So we had to throw it all in! Peaches, raspberries and blueberries! Taste the rainbow! I can't stop talking about how delicious and super easy the freezer jam recipe was to make! Strawberries are $1.79 this week at Target (you can snag a $.50/1 coupon by going to driscoll's website and signing up for their newsletter) and I have coupons to buy the jars. I see a mother/daughter project in the very near future.


In the mean time, I was telling reader Teri about the jam yesterday and she was inspired too! 
Strawberry-Peach and Strawberry freezer jam made my Teri and her husband.


Here's the recipe:


Berry Blitz Freezer Jam 
(courtesy of freshpreserving.com)


You will need:
 5 Tbsp Ball®RealFruit™ Instant Pectin
 1-1/2 cups sugar
 1 cup crushed blackberries (about 1-1/2 6-oz container)
 1 cup crushed blueberries (about 2 4.4-oz container)
 1 cup crushed raspberries (about 1-1/2 6-oz container)
 1 cup crushed strawberries (about 1 1-lb container)
 Zest of 1 small lemon
 5 Plastic Ball® (8 oz) Freezer Jars


Directions: 
1.) STIR sugar and instant pectin in a bowl into well blended. 
2.) ADD blackberries, blueberries, raspberries, strawberries and lemon zest. Stir 3 minutes. 
3.) LADLE jam into clean jars to fill line. Twist on lids. Let stand until thickened, about 30 minutes. Serve immediately, refrigerate up to three weeks or freeze up to one year. 


Feel free to substitute all or some of the berries for other fruits. Just make sure you have the right amount of fruit that corresponds with the amount of pectin. No cooking, the kids can help!


JAM WILL KEEP IN YOUR FRIDGE FOR 3 WEEKS, IN YOUR FREEZER FOR 1 YEAR!

Tuesday, June 21, 2011

Tasty Tuesday: Cheesy Chicken Spaghetti

Photo courtesy of Google..because I can't seem to snap a picture!

This is one of my favorite busy weeknight meals. Super easy and takes little preparation. I try to keep some precooked, shredded chicken in the freezer for days like this when I need something quick.

Cheesy Chicken Spaghetti
1- small box of spaghetti
2 c. chicken, cooked and shredded
2 c. cheddar cheese, shredded and divided
1 can cream of chicken soup (or make your own like me)
1 c. milk
dash salt, pepper and garlic powder

Cook your noodles; drain. Combine chicken cream of chicken soup,milk, seasonings and noodles together; add in one cup of cheese. Place is greased13x9 casserole dish. Top with remaining cheese. Bake at 350 degrees for 20-25 minutes or until cheese on top is melted and bubbly.

Tuesday, June 14, 2011

Tasty Tuesday: Blueberries!

Blueberries! Bluebees! Boobees! Those are the names they are called by the little ones running around here. They love their blueberries! It's blueberry season here in South Mississippi. We spent Sunday evening at my grandparents picking blueberries to hearts content. Allyson ate more than she picked!


In honor of all the blueberries here is my tried and true Lemon Blueberry Scone recipe.


Lemon Blueberry Scones

2 1/2 c. flour (you could use 50/50 whole wheat and white if you want)
1/2 c. sugar
2 tsp. baking powder
1/2 tsp. baking soda
1/2 tsp. salt
2 T. butter
3/4 c. half and half
zest of one lemon
1/2 c. blueberries (frozen works best)

In a bowl combine all the dry ingredients; cut in butter until it makes crumbs (like when you make a biscuit). Add half and half, lemon and blueberries.  Mix gently! Put contents on a floured surface and knead lightly until dough comes together. It will be flaky. Pat out until about an inch or so thick. Cut into triangles like a pizza. Bake for 15 minutes or until slightly browned at 375 degrees. These freeze really well too. Freeze on cooking sheet before storing in a freezer bag.


Icing:
1 T. lemon juice
1/2 c. powdered sugar
2 tsp. water (DO NOT USE MILK or you will have buttermilk!)

Mix the water in 1 teaspoon at a time until desired consistency is reached. Spread on scones while still warm.


Wednesday, June 8, 2011

Tasty Tuesday: Everything Yeast Dough

This is a repost from my other blog, Mostly Homemade.


We love pizza at my house. Matter of fact I think most of us could eat pizza for breakfast, lunch, and dinner. There's just one problem pizza is expensive! Even the cheap pizza gets expensive when you are at the end of your two week pay period (can I get an Amen?!)

I've been playing around with making my own pizza dough for a few months. I've used boxed mixes, the bread machine and more. You name it and I've probably tried it. Finally I have found a fool proof recipe that turns out great every time and is super versatile. 


Everything Yeast Dough

1 T. fast acting yeast (by my measurements 1 of the little pouches is equal to 1 T.)
2 1/2 c. flour (you could do a mix of whole wheat)
1 tsp. turbinado or regular sugar
1 tsp. salt
1 c. warm water (I just let my tap run for a few minutes to get it nice and warm)

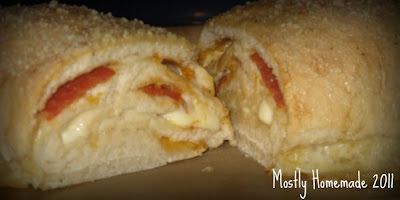
Mix the yeast with the water; mix all dry ingredients together. Stir in water until dough starts to come together. Dump onto floured surface and knead for just a few minutes until dough stays together well. Makes two small pizzas, or wrap small pieces around little smoked sausages or cut hot dogs, or cover with pepperoni and cheese then roll up jelly roll style to make a Stromboli or simply cut into strips for bread sticks.


For the Stromboli and bread sticks I slather the outside with butter when I pull it out of the oven and then sprinkle garlic sea salt and Parmesan cheese on top! YUM! Also, I don't put the pizza sauce on the inside. Instead I put it in a little bowl and serve it as a dipping sauce.